NZWN - Wellington
Positions
| Position Name | Shortcode | Callsign | Frequency | Login ID | Usage |
|---|---|---|---|---|---|
| Wellington DLV | DWN | Wellington Delivery | 128.200 | NZWN_DEL | Secondary |
| Wellington SMC | GWN | Wellington Ground | 121.900 | NZWN_GND | Secondary |
| Wellington ADC | TWN | Wellington Tower | 118.800 | NZWN_TWR | Primary |
| Wellington TMA | WTMA | Wellington Approach | 119.300 | NZWN_APP | Primary |
Event Only Positions
Important
The following are designated as Event Only positions, and may only be staffed during a VATNZ event where approved, or if explicitly authorised by the Operations Director.
| Position Name | Shortcode | Callsign | Frequency | Login ID | Usage |
|---|---|---|---|---|---|
| Wellington Terminal Radar | WDEP | Wellington Departures | 122.300 | NZWN_DEP | Events - Traffic Management |
Airspace
The Wellington CTR/C follows the lateral boundaries as shown below from SFC to A025. The CTR/C comprises of seven sectors - Kelburn, West, Sinclar, Turakirae, East, Somes and Instrument Sectors.
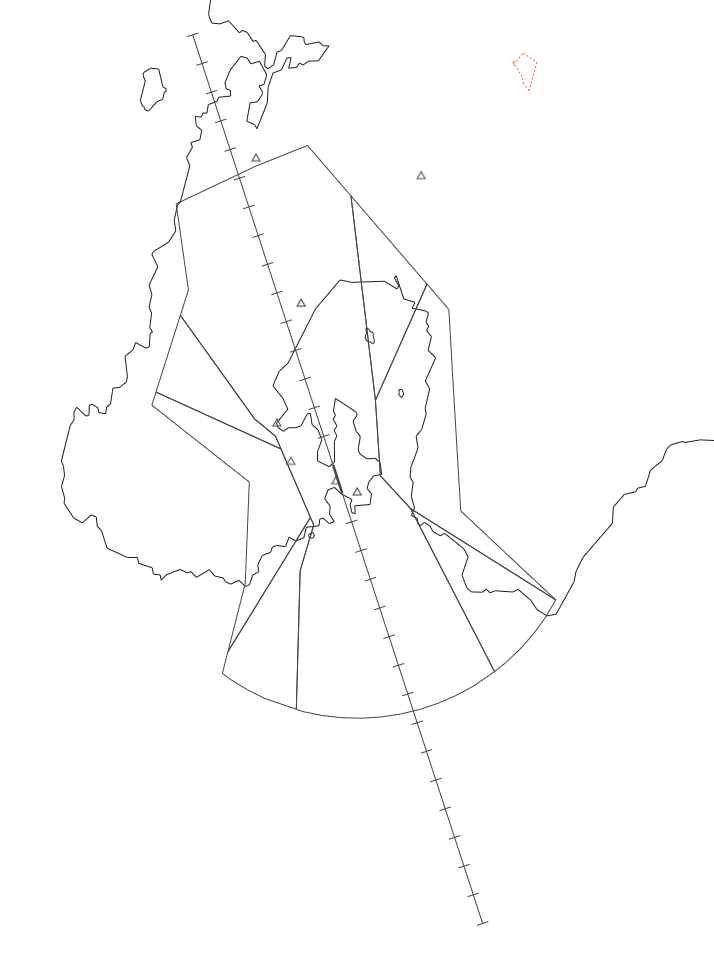
Areas of Responsibility
The areas of responsibility are as depicted below.
Transfer of Control Points
| Transfer Flow | Requirements | Notes |
|---|---|---|
| Delivery -> Ground | Once PDC has been issued either through Voice or DCL. | |
| Ground -> Tower | Prior to arriving at their assigned hold, once clear of other traffic. | Aircraft operating on the Western Apron are not required to contact Ground or Tower until reaching one of the M5 Lima holds, or holding short of M4. |
| Tower -> Ground | Once clear of the active runway. | Aircraft vacating to the Western Apron may stay with Tower, provided there is no conflicting traffic. |
| Tower -> Approach | For most airline traffic, when airborne. For GA, when leaving the zone, if applicable. | Aircraft assigned a SID with a visual segment, such as the IDVAL #U or IPKEP #T may be retained by Tower until clear of other aircraft, once established inbound to their IDF, or if requested by TMA for separation. |
| Approach -> Tower | When established on an instrument final, or if on an RNP approach, overhead the IAF. |
Control Positions
Clearance Delivery
Clearances shall be issued by the Delivery position, and may be given via DCL or voice.
STAR Clearance for NZNS & NZWB
As the flight time between Wellington, Nelson and Woodbourne (Blenheim) is so short, and to reduce pilot and controller workload, the controller shall include a STAR clearance for their destination in their departure clearance.
If online, Delivery shall confirm the STAR with Wellington TMA prior to passing to aircraft.
Clearance to Nelson
Wellington Delivery: "SDA333, Cleared Nelson 1 via LUBSI 2A arrival at 11,000ft, IVDAL 1Q departure, Squawk 5021"
Ground
Pushback
Pushback and start up clearances are managed by the Ground Controller. For pushbacks on apron areas the phraseology “Pushback at your discretion” is used to indicate that the pushback is contained within an uncontrolled portion of the movement area and that ATC may not be aware of all apron activity.
During periods of high-traffic, the Ground Controller may issue explicit push and start directions to deconflict and prioritise traffic flow.
International Gates
The international gates only have capacity for one pushback at a time. Should a second aircraft request pushback, they should be instructed to push to a remote push point, such as Z1. Not all pilots are aware of these remote push locations, so the Ground Controller may issue plain English push directions at their discretion.
Night Pushback Operations
Wellington has two marked pushback holding zones, Z1 & Z2. These zones are used during busy periods or at night to avoid blocking entry and exit points to the rest of the gates.
Taxiing
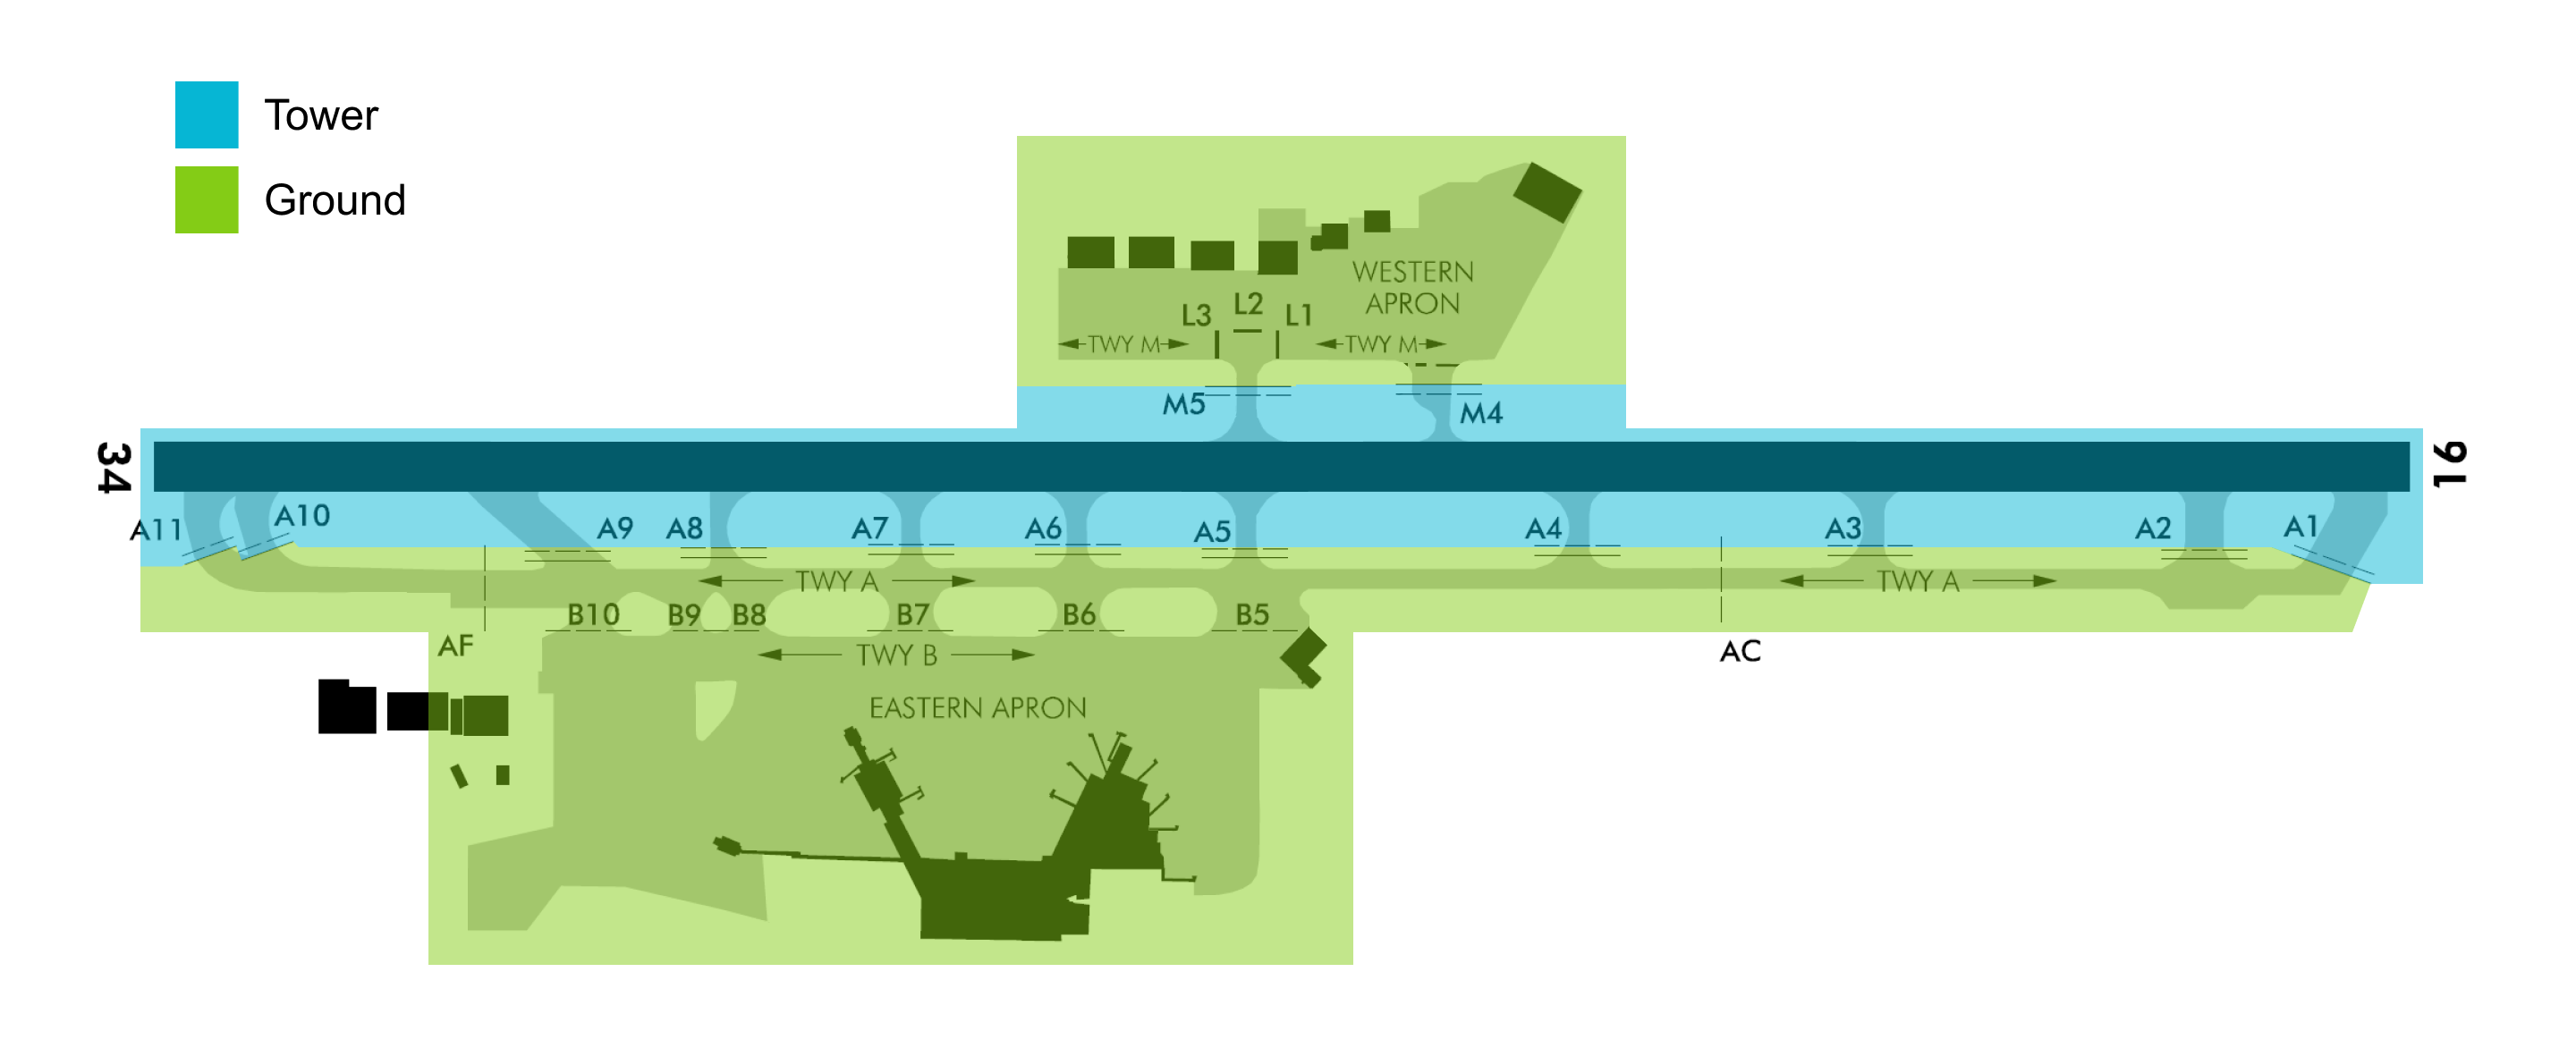
As there is only a single main taxiway, the Controller shall feed aircraft onto taxiway A using the R, S, T or U taxiways and B intersections as required. Aircraft taxiing from the Eastern Pier shall be instructed to taxi via one of the R, S, T or U taxiways or directly via B8, B9 or B10 when Runway 34 is in use - or B9 , B8 and B7 when Runway 16 is in use.
This frees up B6 and B5 for traffic taxiing from the main apron and international gates.
Use of Holding Points
| Type | Runway 34 | Runway 16 |
|---|---|---|
| Large Jets | A11 |
A1 |
| Medium Jets | A11 |
A1 or A2 |
| Turboprops | A9 or A11 |
A2 or A3 |
Tower
The Tower shall ensure that all VFR traffic within the Wellington CTR/C does not conflict with any IFR operations. IFR operations shall take precedence over VFR.
Unless established within the aerodrome circuit, VFR aircraft are not authorised to operate under any approach path, or within 3nm laterally of the approach path, unless explicitly authorised by the Tower or Approach Controller.
Aircraft that have been cleared to operate within the Kelburn, Somes, East, Sinclair or East Sectors are deemed to be separated from IFR arrivals operating on straight-in approaches in the Instrument Sector. When RNP-AR approaches are in use, the Tower Controller is to ensure that the RNP path has a lateral buffer of at least 3nm.
Departures
Aircraft departures shall be managed in-line with the Runway Operations section
Where possible, and where weather permits, the SIDs with visual departure segments shall be issued to small Approach Category A and B aircraft (C208, PC12), to ensure an immediate turn to their departure's IDF.
Golden Bay Air BN-2 Aircraft
For the purposes of traffic separation, the Britten Norman Islander shall be classed as a Category A aircraft.
SID Assignment
Most of Wellington's SIDs are straight-forward, however there are a few considerations that must be made when issuing an aircraft with their clearance.
For Domestic aircraft the Controller shall issue the SID that is suggested by the Controller Client.
| Runway | Procedure | Allowed A/C Categories | Is it divergent? | Notes |
|---|---|---|---|---|
| 16 | ATVEV #Q |
Cat A to D | Yes -> 20° after URBEM |
Preferred departure for Jets |
| 16 | AGROR #Q |
Cat A to C | Yes -> 40° after URBEM |
Preferred departure for southern-bound Props via VENAM |
| 16 | UPROG #Q |
Cat A to C | Yes -> 40° after URBEM |
Preferred departure for northern-bound Props |
| 16 | IVDAL #Q |
Cat A to C | Yes -> 50° after URBEM |
Preferred departure for NZNS/NZWB traffic. |
| 16 | IVDAL #U |
Cat A to C | Yes -> 30° at A005 |
Same as IDVAL #Q, but with a visual segment to IDF. Turns divergent passing A005. |
| 16 | NZWN #C |
Cat A to D | No | Least preferred departure due to manual vectoring required. |
| Runway | Procedure | Allowed A/C Categories | Is it divergent? | Notes |
|---|---|---|---|---|
| 34 | UPLUD #R |
Cat A to D | Yes | Preferred departure for Air NZ Jets. Has an RNP segment until UPLUD, thence RNAV 1. |
| 34 | UPLUD #P |
Cat C Only | Yes -> 18° after COUBY |
Preferred departure for all other domestic and international Jets |
| 34 | IPKEP #P |
Cat A to C | No | Preferred departure for western-bound Props |
| 34 | URGEV #P |
Cat A to C | Yes -> 42° after GANJI |
Preferred departure for northern, southern and eastern-bound Props |
| 34 | IPKEP #T |
Cat A to C | Yes -> Passing A015 |
Same as IDVAL #Q, but with a visual segment to IDF. Turns divergent passing A015. |
| 16 | NZWN #D |
Cat A to D | No | Least preferred departure due to manual vectoring required. |
Assigned Headings
To ensure a divergent departure occurs due to traffic, WN TMA may request an aircraft be assigned a heading to fly once passing A005. This ensures a 30 degree offset from the centreline exists, and therefore another aircraft may then depart. These will usually be issued when an aircraft is at the holding point, and will be given to the Tower as a part of WN TMA's release of the aircraft.
Issuing a departure heading
Wellington Tower: "SDA671, additional departure instructions, report ready to copy"
SDA671: "SDA671, ready to copy"
Wellington Tower: "SDA671, on departure turn right heading 250, climb three thousand"
SDA671: "SDA671, on departure turn right heading 250, climb three thousand"
VFR Procedures
Arrival
In order to lessen the amount of instructions given to VFR traffic, the Controller shall issue a published VFR arrival where possible. Once the Pilot reports overhead the respective VRP, the Controller shall integrate them with the circuit. AIP Chart refers NZWN arrivals.
Important
If instructed to join via the overhead, it is the Controller's responsibility to ensure that the missed approach is protected. A non-circuit side join may be given instead.
Departure
As Wellington's CTR/C is split into different sections, many VFR procedures have been put in place to ensure safe airspace operation. In order to lessen the amount of instructions given to VFR traffic, the Controller shall issue one of the VFR Departure Procedures where possible. AIP Chart refers NZWN departures.
As flights to the West, North, and Southwest require a turn against over a populated area, against the circuit direction, the Tower shall approve a turn against the circuit direction.
Turn against the Circuit direction
Wellington Tower: "On departure a early left/right turn is approved. Runway 16/34, cleared for takeoff"
Helicopters
All Helicopters operating in or out of Wellington tend to operate from the Western Apron and must ask for clearance to lift and cross the active runway before departing.
Helicopter Departure Clearance
CFL10: "Wellington Tower, CFL10 at the western apron, request lift to operate in the city sector"
Wellington Tower: "CFL10, Cleared to lift at own discretion to operate in the city sector, cleared to cross the runway 16 threshold, report clear"
If runway or instrument sector are not clear:
Wellington Tower: "CFL10 hold position due traffic. Remain on the ground, you can expect a lift in x minutes"